- All Products
- Shop by Brands
- BW Technologies
- BW Technologies
- BW Technologies Monitors
- Models
- BW Clip
- BW Clip4
- GasAlertClip Extreme
- GasAlert Extreme
- GasAlertMicroClip XT
- GasAlertMicroClip XL
- GasAlertMicroClip X3
- GasAlertQuattro
- GasAlertMax XT II
- GasAlertMicro 5 Series
- SamplerPak
- IntelliDox Docking System
- MicroDock II
- BW Ultra
- BW Solo
- Gas Monitors
- Gas Monitor Manufacturers
- BW Technologies
- Bacharach
- Biosystems
- Crowcon
- Gas Clip Technologies
- GfG Instruments
- GMI/Detcon
- Honeywell Analytics
- Industrial Scientific
- MSA
- RAE Instruments
- RKI Instruments
- Gas Monitor Categories
- Single-Gas Monitors
- Multi-Gas Monitors
- Zero Maintenance Monitors
- Fixed System Gas Monitors
- Confined Space Kits
- Wireless Fixed Point Gas Detectors
- Hydrogen Sulfide (H2S) Monitors
- Calibration Gas
- Combustion Analyzers
- Water Quality
- Reliability Instruments
- Refractometers
- HVAC
- Weather
- Temperature
- Laboratory
- Sound
- IAQ
- Electrical
- All Categories


Installing Fleet Manager II
Installing Fleet Manager II
Fleet Manager II is required to configure the detector. To install Fleet Manager II, refer to the Fleet Manager II CD-ROM that includes the
- installation wizard, and
- Fleet Manager II Operator�s Manual
From the User Options tab in Fleet Manager II, two sections are provided to add data, enable/disable features, and to define settings for the sensors and the detector. They are as follows:
- Device Configuration
- Device Configuration
Using Fleet Manager II to Configure the Detector
When Fleet Manager II is installed, refer to Table6, Figure3, and the following procedures:
Table 6. Connecting the IR Link
| Item | Description |
| 1 | IR and charger interface |
| 2 | GasAlertMax XT II |
| 3 | IR Link |
| 4 | USB cable |
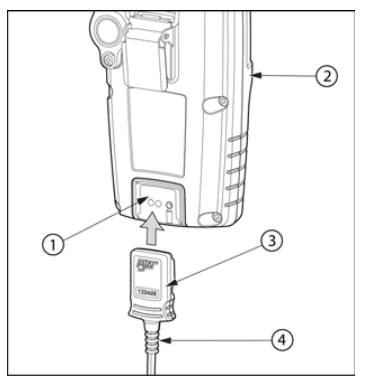
Figure 3. Connecting the IR Link
1. Activate the detector and wait for the startup tests to complete.
2. Connect the USB cable to the USB port on the computer.
3. Connect the USB cable to the IR Link.
4. Insert the IR Link into the IR interface on the back of the detector.
5. From the PC, open Fleet Manager II.
6. Click Administration.
7. From the Administration toolbar, click Login / Logout to access the Enter Password dialog box. Enter Admin and click OK.
8. From the Devices toolbar, click Configure Device via IR Link to access the GasAlertMax XT Configuration window.
9. From the configuration window, click Retrieve from Device at the bottom of the window.
10. Refer to the following sections in this guide for descriptions about how to enter data, enable/disable, and define settings.
11. When all settings are defined, click Save to Device at the bottom of the configuration window to save the configuration to the detector.